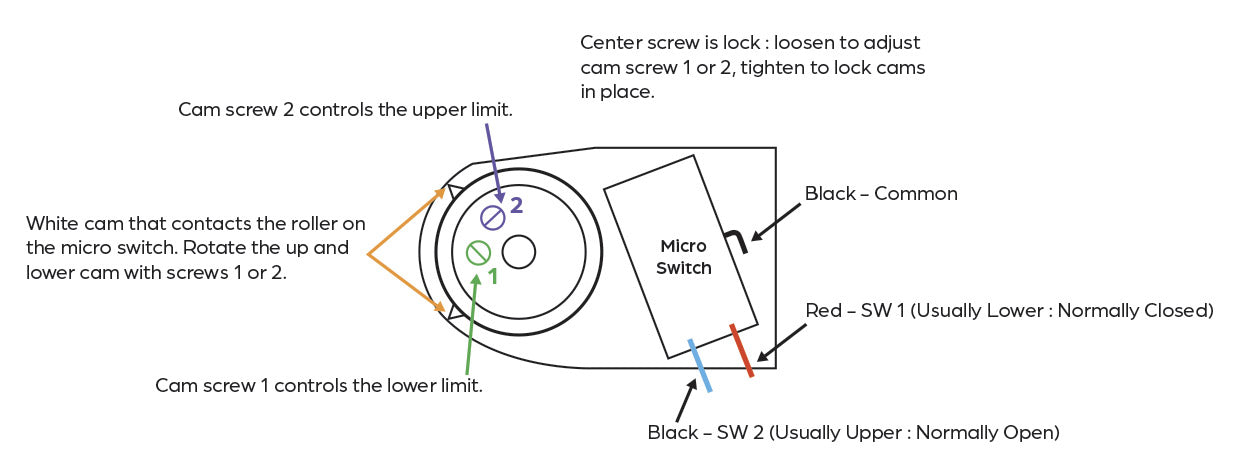
Travel limit switches must be properly installed and adjusted. Regardless of manual or automatic mode of operation, the activation of the limit switch in the given direction will stop the motors.
Installation
- Ensure the power to the Premier Remote control box is turned off and de-engergized.
- Install limit switch at correct mounting location. Mount the limit switch by fork parallels to the pipe. If the fork is not parallel, the limit switch could be damaged or malfunction.
- Using the supplied wire from the limit switch, route the wire to the Premier Remote box.
- Strip the limit switch wires; red, black, and blue.
- Install the red, black, and blue wires to the lugs in the premier remote box. Black is common, Limit Down is Red (Left), Limit Up is Blue (Right).

Tools Required for adjusting the limit switches (KALS KCLS KELS): Phillips Screwdriver, Small Regular Screwdriver
Adjustment
- Remove the limit switch cover by loosening the two screws holding the cover.
- Press the direction UP button on the Premier Remote Box front panel. When the lift is at the desired maximum height, release the button.
- Loosen the center screw shown in the limit switch diagram.
- Adjust the upper limit using screw 2 (blue wire). Turn the screw so that the cam contacts the microswitch roller arm in the direction the cam was turning. You will hear a small click. If the roller cam is already contacting the switch, turn the screw 2 in the opposite direction, move the lift and then readjust.
- Press the up direction button on the Premier Remote Box inside panel. Verify that the lift does not turn on.
- Press the down direction button. Watch the cam that is associated with screw 1. Lower the lift to the minimum height. Turn the cam 1 so that it contacts the microswitch roller arm in the direction the cam was turning.
- Tighten the set screw and reinstall the limit switch cover.
